
|
Choose: |
|
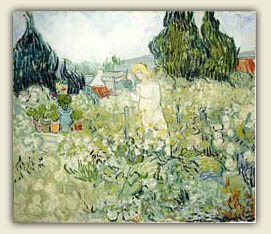
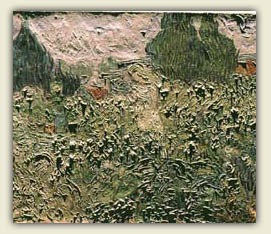
Notice the differences between van Gogh’s brush strokes under normal light and grazing light van Gogh, Mademoiselle Gachet au Jardin, Louvre What makes van Gogh’s art so special? One factor is van Gogh’s distinctive brush work. For evidence, look at a grazing light image of one of his paintings, which you can see by switching between the two images above. What you can see now? Grazing light shows you that van Gogh used random strokes to suggest movement, and more direct strokes to follow forms and emphasize the roundness or solidity of objects. |
|
When art historians and curators study a work of art, they begin with a thorough visual examination to determine both the artist’s original technique and the condition of a painting. Through careful attention to detail, art historians discover important details such as the revealing patterns of craquelure, the superposition of the paint layers, and the location of retouches and restorations. Digging deeper through the use of microscopes enables experts to verify the authenticity of a painting and its signature.
Grazing light
Experts use grazing light to examine paintings in the visible spectrum. Lights are set up at very shallow angles to the surface of the painting to create what is known as grazing light or raking light. Grazing light reveals details such as surface defects, distortions of the support, craquelure, and impasto with great clarity. Grazing light also increases the depth of heavy, textured paint strokes, such as found in impasto. This allows art historians to successfully study stroke patterns, making it easier to observe the manner of the stroke, the direction of the stroke, and the viscosity of the paint. You can learn a lot about the artist’s technique as well as what he may have intended to convey to his viewing public by examining his brushstrokes in such great detail.
Lights can be set up in other ways to divulge even more information about a painting. For instance, paintings on canvas can be illuminated from behind, which is known as transmitted light. This can reveal severe paint loss. Transmitted light can be applied in other situations, such as in the study of signatures, overpaints, crack patterns in wooden panels, and alterations to both works of art and documentary artifacts on paper supports.
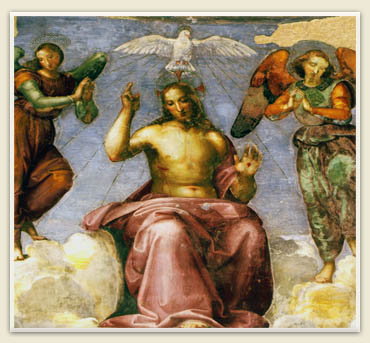
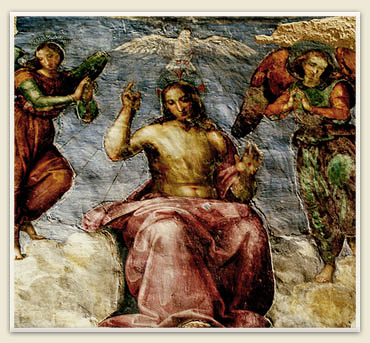
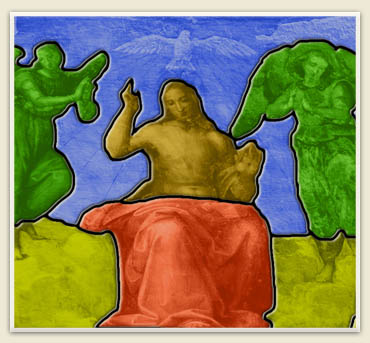
The giornata in a Raphael’s fresco
If you were to use grazing light to examine the Raphael fresco above, you would see the main figures outlined with deep incisions. Looking carefully at the shadows, you could easily spot six areas. Each of these areas is called “giornata,” which means “a day’s work.”
When painting fresco, the artist added a thinner, smooth layer of fine plaster (the intonaco) to the area of wall that he expected to complete in a day, often matching the contours of the figures or the landscape. A layer of plaster typically required 10 hours to dry; an artist would begin to paint after one hour and continue until two hours before the drying time — providing him with seven hours of working time.
|
Choose: |
|
Compare the differences between visible and grazing light to identify the different areas of giornata in Raphael’s fresco. Raphael, Chapel of Saint Severo, fresco, 1520, Perugia. When you stand in a church or a noble palazzo and stare up at beautiful Renaissance frescoes, they look smooth and luminous. Saints or heroes come to life against a backdrop of blue sky, and it’s easy to forget that what you see is a wall or ceiling covered with colored mortar. What happens when you get closer? The magic dissipates and frescoes become fragile plaster. Suddenly you can see bumps, detachments, and coarse additions. Look closely enough, and a fresco will reveal how long it took for the artist to complete the work. |
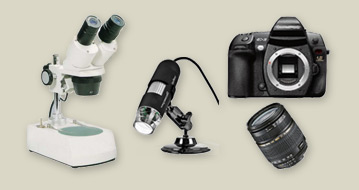
If you want to observe grazing light on your own, attaching a macro lens to your camera will help you to capture more detail. To get even closer, a stereomicroscope or USB microscope will allow you to capture even greater details.
How it works
Both scientific cameras and commercial reflex digital cameras can collect high-resolution details in color digital files. These visible images are used as a reference in order to build up the multispectral model of the painting. Ultraviolet fluorescence, infrared reflectography, and X-ray radiography are added to the visible image. In this way, restorers and conservators are able to observe each multispectral image using the visible one as a reference. High-resolution images can be collected with a macro objective, but a binocular stereoscopic microscope allows 6x to 40x enlargements.
Technical details
If you want to try this at home, you can use a reflex digital camera and common directional halogen lamps to capture a visible image at high resolution in normal or grazing light. For more detail, simply mount a macro lens onto your camera. To capture finer details, you’ll need a stereomicroscope. An economical alternative is a USB microscope, which can be found on the Internet for less than $100.
Looking beyond what the eye can see
The electromagnetic spectrum is invaluable to studying art. This includes wavelengths in the visible spectrum as well as those that are invisible to the human eye. While we can only see the narrow range of light in the visible spectrum, we can use special cameras to take images of artwork using X-ray, ultraviolet, and infrared wavelenghts, which allows us to gain even deeper insights into the artwork.
One of the most effective ways to examine the condition of a work of art is through multispectral imaging. Multispectral imaging is non-invasive and non-destructive, which makes it a totally safe method for studying art. This type of imaging divides the light spectrum into a number of frequency bands and takes many pictures of the same scene, each at a different wavelength. Together, these pictures form a multispectral image.
By responding to ultraviolet and infrared light, the multispectral camera reveals information that is otherwise concealed from the human eye. Multispectral imaging can also be used to read and record faded or burnt manuscripts - even from carbonized and damaged fragments. Because books were often “recycled” in order to use the parchment for copies of other texts, what we now consider treasured antiquities were once dismounted, erased by washing off the original ink, and overwritten with new text. These washed out inks can still be read using the appropriate wavelength of light (see carbon black technical detail). This exciting scientific approach has the potential to recover significant works that have been lost to humankind for centuries.
Delving deeper into multispectral imaging
Multispectral imaging is the procedure used to observe an object using selected ranges of wavelengths in the electromagnetic spectrum. Paintings are normally observed under visible light (780-400nm), such as when we look at a painting with our eyes. In the visible range we can get two kinds of images: a plain photographic picture (VIS) and a grazing light image (GL) obtained using a raking source of light.
Through the use of specialized technology, we can capture the images of artworks in ranges of wavelengths that are much shorter or much longer than what we can see with the naked eye. The UV range (400-360nm) produces ultraviolet fluorescence images (UVF) and ultraviolet reflected images (UVR). The infrared electromagnetic radiation most close to the visible range (1100-780nm) can be detected by a modified photographic camera, which is used to collect infrared CCD images (IRCCD) and infrared false color images (IRFC). More sophisticated cameras can detect infrared light even further down the range (1100-1700nm), producing infrared reflectography images (IRR). An x-ray, which is light at much shorter wavelengths, produces an x-ray radiograph (RX).
Those who study manuscripts and works of art glean a wealth of information from each method. Taken together, these methods are complementary, because each spectral range interacts with a different layer of a painting. For instance, UV light is blocked by the varnish. However, visible light can go through the varnish, where it is then reflected by the painting’s film. Infrared light can pass through the painting film and "see" the underdrawing. X-ray light passes through the entire painting, as well as through thick wood supports. All of these methods combine to generate an illuminating view into the structure and history of an artwork or manuscript.
Although professional analytical instruments are prohibitively expensive for laypeople, you can easily conduct certain kinds of multispectral imaging on your own. The technology inside consumer-range digital cameras and webcams can be modified with easy-to-find, inexpensive items that will enable you to discover the layers of information contained in any painting.
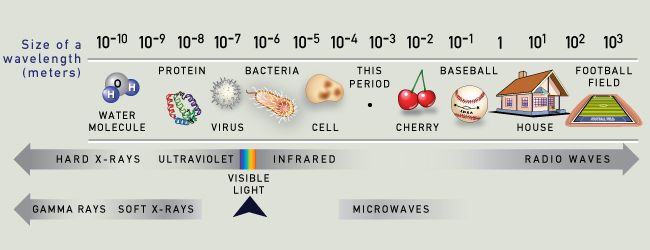
Multispectral imaging allows us to examine a painting under different ranges of electromagnetic wavelengths. The examples above show the size of the wavelengths of various kinds of light. Visible, Infrared, Ultraviolet and X-Ray are the most commonly used imaging methods for examining paintings.
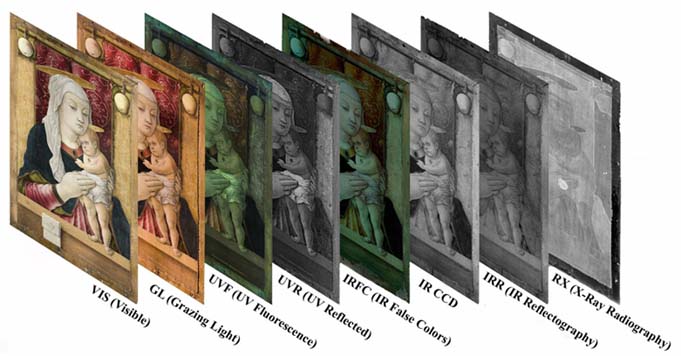
Multispectral imaging allows us to examine a painting under different ranges of electromagnetic wavelengths. The examples above demonstrate the most commonly used imaging methods for examining paintings. Note how each type of multispectral imaging reveals particular information based on the abilities of that method.
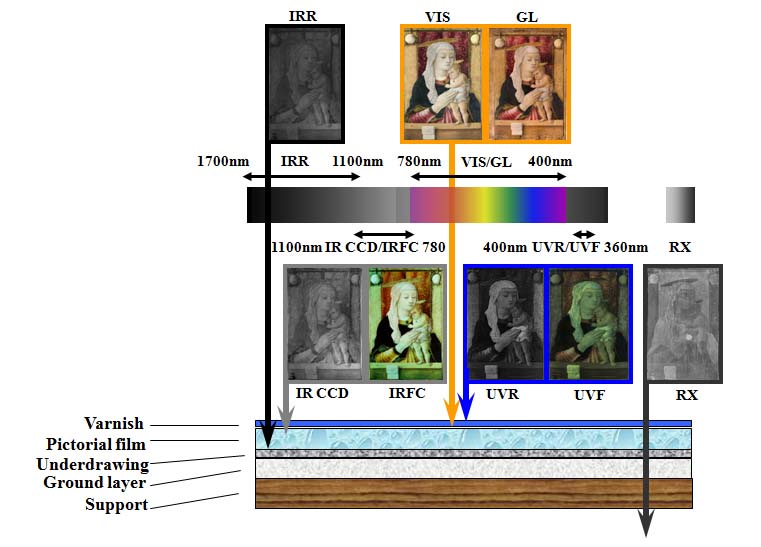
This example illustrates the abilities of different types of multispectral imaging. Each imaging method uses a specific wavelength of light that penetrates different layers of a painting. Shorter wavelengths (such as UV) interact with the outer layers (such as varnish), while longer wavelengths can pass through the varnish and interact with the pictorial film and the underdrawing.
See how using both X-ray and Infrared imagery can reveal the history of a Renaissance painting. It has always been known that the Feast of the Gods (below) was painted by two great artists, Giovanni Bellini (1427-1516) and Titian (1490-1576). Titian repainted most of Bellini’s landscape. This fact was recorded by Vasari in 1568. In the years since, however, a more complex story was lost... only to be rediscovered four centuries later. This exhibit is about the rediscovery of this painting’s past.
The story begins in the 1950’s, when researchers at the National Gallery of Art took X-ray photographs of the Feast of the Gods. They discovered glimpses of a previously unknown composition. Not only did they find Bellini’s landscape hidden behind Titian’s, they also found an extra hidden landscape that had been long forgotten, as well as other interesting changes.
Looking closely at the X-ray, you’ll see the most dominant feature is the frieze of trees which continues from the right to the left. What else do you see? Look also at the Infrared reflectograph. The "Versions" are hypothetical reconstructions of how the first and second versions might have looked.
Explore the painting above by dragging around the spyglass, and choosing the image for the main view and the inside of the spyglass.
Learn more about the Feast of the Gods in another, small WebExhibit. Go »