
Microscopy reveals an amazing amount of information about a painting’s structure, based on just a tiny sample. A sample of just tens of millimeters is enough to yield substantial new insights into a work of art.
While microscopy is more invasive than photography or radiography, once a sample of the painting is embedded in a resin it can be analyzed with a number of instruments. The cross-sectional analysis of paint layers displays a chronology of the artist’s working methods, from the initial preparatory layers through the paint and varnish layers. The painter builds up the paint layers to develop subtle effects of tone, color, and surface texture, resulting in a complex three-dimensional structure - which can be sleuthed out by an art conservator with a microscope.

Notice the differences in Claude Monet’s painting, Port-Goulphar, Belle-Ile, when you examine a cross-section of the painting under UV light (right top) versus OM visible light (right bottom).
Optical microscopy (OM)
The simplest microscopy method is optical microscopy (OM), which allows conservators to detect the dimension and size of the pigments’ grains, as well as the sequence of the pictorial layers. In addition to being viewed in normal light under a microscope, cross sections of paintings can be viewed using ultraviolet light and a variety of filters. Under these different lighting conditions, restoration layers can be visually distinguished from original layers.
Did Impressionists really paint quickly?
Myth or fact: Impressionists – especially Monet – painted quickly, freely, and intuitively.
Observing a cross-section taken from Monet’s Port-Goulphar reveals the truth. Look at the edges of the paint layers, specifically at the separation at the interface between the pigments’ layers. The edges look sharp, divulging that this section was painted by applying wet paint over dry paint. Because oil paints dry slowly, Monet must have worked on this painting over a long period of time. However, some other painting samples show regions with no separation between paint layers, indicating that these areas were painted over wet paint. The conclusion? Monet painted quickly, but added thoughtful retouches over time.
How it works
Samples of a painting are preferably taken from the edges of preexisting damaged regions. Tiny paint chips (approximately 400 microns in diameter) are embedded in polyester resin, matching the hardness of an aged oil paint film. These are then sectioned with a microtome to reveal a cross-section of the paint layers. The exposed sections are examined by optical microscopy under both incident visible and ultraviolet illumination.
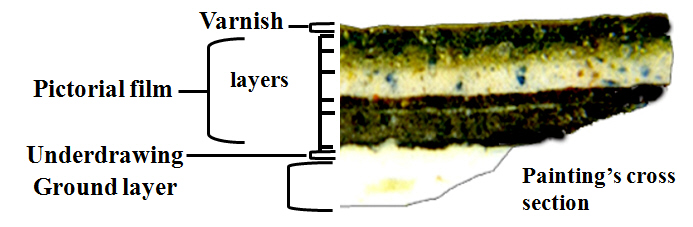
Notice the distinctly different layers in this cross-section of a painting under visible OM. The layers that comprised the pictorial film can be distinguished from the varnish, the underdrawing, and the ground layer. What might this tell you about the painting’s history?
Technical details
Cross-sections have traditionally been prepared by hand. First, a chip of paint, no bigger than a pinhead, is removed from the painting with a scalpel. This fragment is mounted and the layers are exposed through sanding and polishing. Polishing a cross-section is difficult because of the small sample size, paint chemistries, and paint solubilities. Samples are rarely flat enough for viewing magnifications, and final surfaces are marked by scratches and other flaws. An optical microscope makes fast analysis of surfaces possible.
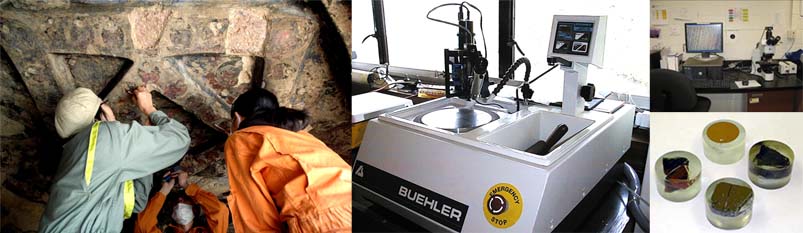
From left to right: Researchers taking samples from cave paintings to be used as cross-sections, a polishing machine, an optical microscope, and polished cross-section ready for imaging.
Scanning Electron Microscopy (SEM)
In order to obtain information about the composition of the individual pigment layers in a cross-section, the samples may be analyzed with a scanning electron microscope. Using a beam of electrons to form the image (instead of light), scanning electron microscopes can produce images at extremely high magnification (up to 100,000 times). In addition, they can be used to identify the chemical elements present in each layer, or even individual pigment particles, thus allowing the pigments comprising each layer to be inferred.
A scanning electron microscope is also used to collect a so-called backscattered electron image of a cross-section. This image shows differences in elemental composition: areas with high average atomic number (such as the lead-containing ground layer) appear light in the images, whereas areas with low average atomic number (such as the organic layers surrounding the bright red layer) appear dark.
Find out how many times Degas rearranged the composition of this painting.
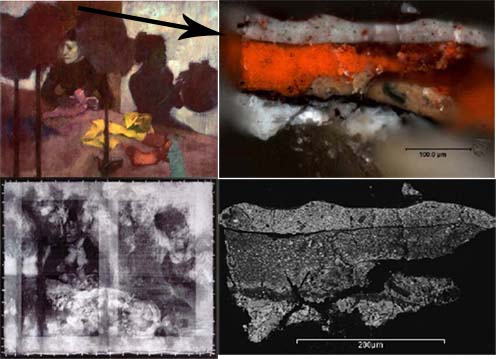
Examine this Edgar Degas painting, The Milliners (top left), using 3 different types of technology. The bottom left image is an x-ray of the painting. Compare this x-ray with the actual painting. What does radiography tell you about the artwork? You can see that Degas reworked this painting many times, because the composition differs between the two images. Next, look at the OM cross-section of the painting on the top right. What does the cross-section reveal? Now that you know how many layers of paint he used, you can further explore the painting through an SEM back scattering image of the same cross-section (bottom right), where you will learn about the actual pigments that he used.
Experts know that Degas rearranged compositions and reworked paintings, but how could they prove it? An x-ray of his painting "The Milliners" suggests that Degas reworked the painting numerous times. But in order to get confirmation and discover how many paint layers there are, a painting sample is put under an optical microscope. Can you tell now how many distinct paint layers are there? You may be able to see the six paint layers, but you can’t know the layers’ pigments until an SEM analysis chamber does its job.
The SEM performs an elemental analysis of each particle. It reveals that the white ground layer is actually composed of lead white; the dark layer above it is lead white mixed with bone black and barytes. The light brown layer towards the right of the sample is lead white and iron oxide earths. The bright central layer is red lead followed by a lead white layer with chrome green and red ochre particles throughout. The thin dark layer at the top is lead white with iron oxide earths.
How it works
The scanning electron microscope (SEM) creates various images by focusing a high energy beam of electrons onto the surface of a sample and detecting signals from the interaction of the incident electrons with the sample’s surface. SEM images have great depth of field, yielding a characteristic three-dimensional appearance useful for understanding the surface structure of a sample. This depth of field and wide range of magnifications are the most familiar imaging mode for specimens in the SEM.
The SEM produces both an image and an elemental characterization of tiny features of the samples. Characteristic x-rays are emitted when the primary beam causes the ejection of inner shell electrons from the sample, and are used to tell the elemental composition of the sample.
The back-scattered electrons emitted from the sample may be used alone to form an image or used in conjunction with the characteristic x-rays as atomic number contrast clues to the elemental composition of the sample.

Left, SEM backscattering image of an ancient brick sample and its elemental characterization based on X-ray fluorescence.
Technical details
Scanning electron microscopes are extremely expensive - among the most costly equipment for art examination - and are typically purchased by consortia of laboratories and institutions.
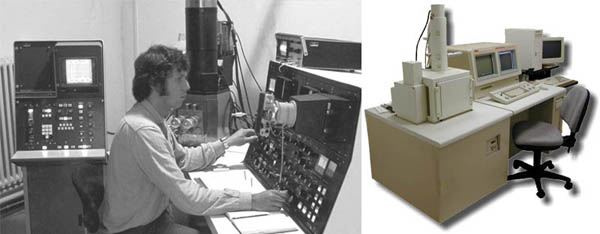
Left: Scanning electron microscope (SEM) from the late 1970s. The machine in the middle background is the column that produces the electron beam with the sample chamber at the bottom, while on the left is a system for analysis of x-rays for elements. Right, a modern SEM system.